I have a n8n workflow that I want to run once per day and I want to use Scaleway for hosting.
n8n comes in a handy Docker container. There seem to be three options for containers with Scaleway
- A Serverless Container. I have explored this option in n8n in a Scaleway Serverless Container.
- A virtual instance (there is a VM image available with the Docker runtime preconfigured)
- Kubernetes Kapsule
In this post, I am exploring the second option.
n8n with a Scaleway Server Instance
In this setup, I am using the Scaleway Load Balancer for SSL termination. If you are looking for a small hobbyist setup that is more cost-efficient, check out how I set up n8n here:
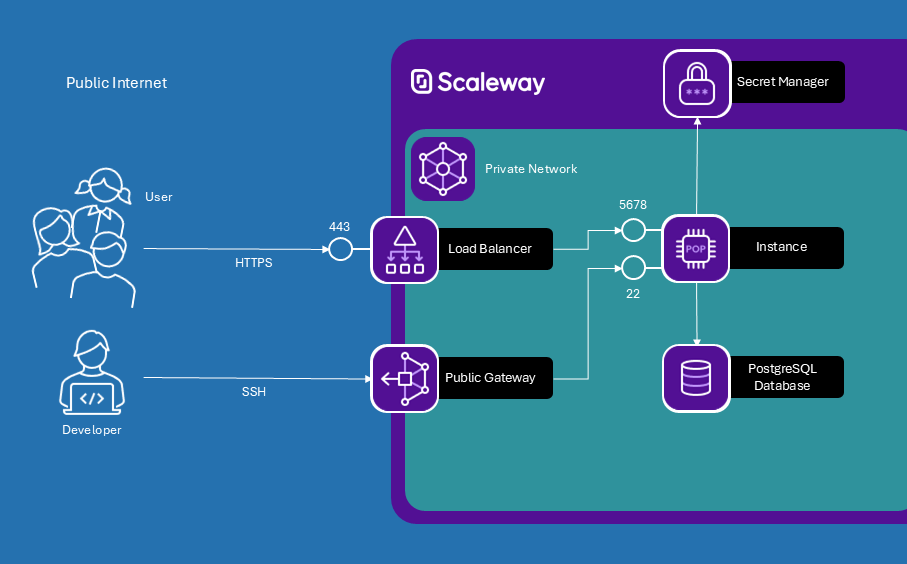
With the load balancer, PostgreSQL database and VPC, my bill of materials is the following:
- A Virtual Instance hosting the n8n application.
- A managed PostgreSQL database used by n8n to save workflows, executions, etc.
- The instance and the PostgreSQL database should live in a private network so that they are not exposed to public internet.
- All the infrastructure around the private network to make it work, especially a Load Balancer to make the n8n application accessible and a Public Gateway for maintenance of resources in the private network.
Initializing Terraform
For the first steps, we are following the steps described in this tutorial: Deploying Your First Infrastructure on Scaleway using Terraform/OpenTofu.
terraform {
    required_providers {
      scaleway = {
        source = "scaleway/scaleway"
      }
    }
    required_version = ">= 1.11"
    backend "s3" {
      bucket                      = "terraformstate"
      key                         = "my_state.tfstate"
      region                      = "fr-par"
      access_key                  = ""
      secret_key                  = ""
      skip_credentials_validation = true
      skip_region_validation      = true
      skip_requesting_account_id  = true
      endpoints = {
        s3  = "https://s3.fr-par.scw.cloud"
      }
    }
}

provider scaleway {
    access_key      = var.access_key
    secret_key      = var.secret_key
    project_id	    = var.project_id
    zone            = var.zone
    region          = var.region
}Instead of putting the access_key and the secret_key for the S3 backend in the terraform file, we are using partial configuration and pass the credentials in a separate file. And in case you are wondering: yes, the Scaleway Object Storage service is S3 compatible.
access_key = "<SCALEWAY_ACCESS_KEY>"
secret_key = "<SCALEWAY_SECRET_KEY>"Then we can initialize Terraform with the following command.
terraform init -backend-config="./state.config"To initialize the Scaleway Terraform provider, we define the respective variables for Project ID and one for project name that we will be using for naming of resources. The respective values we keep in a .tfvars file.
variable "project_id" {
  type = string
}

variable "project_name" {
  type = string
}

# these two variables we are using for the database
# we are "pinning" the password as a variable so we
# have an easier life with database maintenance
variable "admin_db_user" {
  type = string
  default = "admin"
}

variable "admin_db_password" {
  type = string
}The Private Network
Now we are ready to begin with the actual resources. The first step is to create the private network:
resource "scaleway_vpc_private_network" "pn_main" {
  name = "pn-${var.project_name}"
}If no parent VPC is given, the parent will be the default VPC in the region that we have initialized the Scaleway Terraform provider with. I am also letting Scaleway pick a subnet for my private network. See the Terraform Resource: scaleway_vpc_gateway_network for all arguments.
The PostgreSQL Database
To initialize the database instance, we need a little bit more Terraform code. This is because we are not only creating the PostgreSQL instance but a database in that instance and a user for the database as well.
# This creates the PostgreSQL instance with an admin user.
# Note that we are attaching a private network.
# Also note that we do not have a load_balancer {} element.
# This means the database does not have a public IP and
# cannot be directly accessed from outside the private
# network.
resource scaleway_rdb_instance database {
    name           = "db-${var.project_name}-data"
    node_type      = "db-dev-s"
    engine         = "PostgreSQL-15"
    is_ha_cluster  = false
    disable_backup = true
    user_name      = var.admin_db_user
    password       = var.admin_db_password
    private_network {
      pn_id  = scaleway_vpc_private_network.pn_main.id
      enable_ipam = true
    }
}

# Create a database with the name n8n in the instance.
resource "scaleway_rdb_database" "n8n" {
  instance_id    = scaleway_rdb_instance.database.id
  name           = "n8n"
}

# Create a password
resource "random_password" "n8n_user_password" {
  length           = 16
  special          = true
  min_numeric      = 1
  override_special = "!#$%&*()-_=+[]{}<>:?"
}

# Create a database user in the PostgreSQL instance.
# With this, the user simply "exists" in the database server
# but does not have any permissions
resource "scaleway_rdb_user" "n8n_user" {
  instance_id = scaleway_rdb_instance.database.id
  name        = "n8n-user"
  password    = random_password.n8n_user_password.result
  is_admin    = false
}

# Give the user "all" permissions on the n8n database.
# All possible options for permission are
# - "readonly"
# - "readwrite"
# - "all"
# - "custom"
# - "none"
resource "scaleway_rdb_privilege" "n8n_user_privileges" {
  instance_id   = scaleway_rdb_instance.database.id
  user_name     = scaleway_rdb_user.n8n_user.name
  database_name = scaleway_rdb_database.n8n.name
  permission    = "all"
}The VM instance
Creation of the compute instance is pretty straightforward. We are using a pre-configured docker image, so we do not have to install the Docker runtime ourselves.
Note that we are not using the private_network { } element to connect the instance to the private network. We are using the slightly more verbose way with a scaleway_instance_private_nic, because we need data of the NIC (NIC = virtual “Network Interface Card”) in the following step, when we are setting up the Load Balancer.
resource "scaleway_instance_server" "n8n" {
  type = "DEV1-S"
  image = "docker"
  name = "n8n-server"
}

#Connect your instance to a private network using a private NIC.
resource "scaleway_instance_private_nic" "nic" {
  server_id = scaleway_instance_server.n8n.id
  private_network_id = scaleway_vpc_private_network.pn_main.id
}The Load Balancer
The code for the Load Balancer is a bit more verbose again, because we have to create a certificate for the public HTTPS endpoint and we have to set up the route between the public endpoint and our instance.
The steps in detail are
- find the private IP of our instance in the private network
- create a public IP for the Load Balancer
- create the Load Balancer instance and connect it to our private network
- create a backend part for our Load Balancer that will forward to port
5678. We are limiting the server IPs to only the one of our instance obtained in 1. So technically we are not load-balancing, as we have just one instance handling the load. But we are using some of the nice features of Load Balancer, especially the certificate management for the public endpoint and the NAT from external IP to internal IP. - create a certificate that we can use in the load balancer frontend, when we declare the public endpoint. Note that for certificate creation to succeed, the DNS record of the domain specified in
common_namemust point to the public IP of the load balancer. I have my DNS outside of Scaleway (at OVHcloud, actually), so I cannot fully automate this step. What I do is to runterraform applyuntil the public IP is assigned. Then I set the DNS record to point to the chosen load balancer IP in the OVHcloud management console, then come back and runterraform applyagain. The second time, validation of the domain for the certificate will pass and the certificate will be created. - create the frontend for routing all
443traffic to our backend. With all steps completed, traffic reaching our public IP on port443should be fowarded to our instance port5678.
# Find server private IPv4 using private-nic mac address
data "scaleway_ipam_ip" "by_mac" {
  mac_address = scaleway_instance_private_nic.nic.mac_address
  type = "ipv4"
}

resource "scaleway_lb_ip" "v4" {
}

resource "scaleway_lb" "load_balancer" {
  ip_ids = [scaleway_lb_ip.v4.id]
  name   = "lb-${var.project_name}"
  type   = "LB-S"

  private_network {
    private_network_id = scaleway_vpc_private_network.pn_main.id
  }
}

resource "scaleway_lb_backend" "lb_backend_n8n" {
  lb_id            = scaleway_lb.load_balancer.id
  name             = "lb-blackend-n8n"
  forward_protocol = "http"
  forward_port     = "5678"
  server_ips = [ data.scaleway_ipam_ip.by_mac.address ]
}

# Creation of the certificate only works if the DNS record
# specified in common_name points to the Load Balancer IP.
resource "scaleway_lb_certificate" "cert01" {
  lb_id = scaleway_lb.load_balancer.id
  name  = "cert1"

  letsencrypt {
    common_name = "<SUBDOMAIN.DOMAIN>"
  }
  # Make sure the new certificate is created before the
  # old one can be replaced
  lifecycle {
      create_before_destroy = true
  }
}

resource "scaleway_lb_frontend" "lb_frontend" {
  lb_id        = scaleway_lb.load_balancer.id
  backend_id   = scaleway_lb_backend.lb_backend_n8n.id
  name         = "lb-frontend-n8n"
  inbound_port = "443"
  certificate_ids = [scaleway_lb_certificate.cert01.id]
}With the Load Balancer in place, users will be able to reach the N8N application on the configured subdomain. We still need to set up a way to SSH into the instance or to connect to the database for maintenance or debugging.
In the next step we are therefore configuring a Public Gateway.
The Public Gateway
The Scaleway Public Gateway allows us to set up a bastion host for SSHing into our Private Network resources.
resource "scaleway_vpc_public_gateway_ip" "gwip01" {
}

resource "scaleway_vpc_public_gateway" "pgw01" {
  type            = "VPC-GW-S"
  name            = "pgw_${var.project_name}"
  ip_id           = scaleway_vpc_public_gateway_ip.gwip01.id
  bastion_enabled = true
  bastion_port    = <OUR_BASTION_PORT>
}

resource scaleway_vpc_gateway_network main {
  gateway_id = scaleway_vpc_public_gateway.pgw01.id
  private_network_id = scaleway_vpc_private_network.pn_main.id
  enable_masquerade = true
  ipam_config {
    push_default_route = true
  }
}What have we achieved so far?
We now have set up the following infrastructure:
- A PostgreSQL database instance with a database called
n8nand a database usern8n-userthat has a randomly generated password andallpermissions on then8ndatabase. - A VM instance.
- Both the database and the instance are in a private network – not reachable from public internet.
- There are two entry points into the private network:
- a load balancer with a public IP and a certificate, so it can accept HTTPS traffic.
- a gateway that serves as our bastion host into the private network. Through the gateway we can SSH into the instance and tunnel to the database, without directly exposing the instance or the database themselves.
Through the load balancer, requests hitting our public IP on 443 are forwarded to port 5678 of our instance. But as of now, nobody is listening inside our instance. The next step is to set up the application.
The Application
For the application we are using a slightly modified version of the default docker-compose.yml file of n8n.
services:

  n8n:
    image: docker.n8n.io/n8nio/n8n
    restart: always
    ports:
      - "5678:5678"
    environment:
      - N8N_HOST=${SUBDOMAIN}.${DOMAIN_NAME}
      - N8N_PORT=5678
      - N8N_PROTOCOL=https
      - NODE_ENV=production
      - N8N_EDITOR_BASE_URL=https://${SUBDOMAIN}.${DOMAIN_NAME}/
      - WEBHOOK_URL=https://${SUBDOMAIN}.${DOMAIN_NAME}/
      - GENERIC_TIMEZONE=${GENERIC_TIMEZONE}
      - N8N_ENFORCE_SETTINGS_FILE_PERMISSIONS=true
      - N8N_RUNNERS_ENABLED=true
      - DB_TYPE=postgresdb
      - DB_POSTGRESDB_HOST=${DB_HOST}
      - DB_POSTGRESDB_PORT=${DB_PORT}
      - DB_POSTGRESDB_SSL=true
      - DB_POSTGRESDB_DATABASE=${DB_NAME}
      - DB_POSTGRESDB_USER=${DB_USER}
      - DB_POSTGRESDB_PASSWORD=${DB_PASSWORD}

    volumes:
      - n8n_data:/home/node/.n8n
      - ./local-files:/files

volumes:
  n8n_data:
Now the question is how to obtain the configuration variables. I certainly do not want to hardcode them in the compose file. I decided to try Secret Manager for this. So we need a way to fetch the configuration from Secret Manager before we spin up the n8n docker container. Let’s write a little starter script which fetches the configuration from the Secret Manager and then spins up the container with docker compose up.
#!/bin/bash

# Fetch and decode the secret, then set it as an environment variable
set_secret_as_env_var() {
  # The name of the secret to fetch
  local secret_name="$1"
  # The name of the environment variable to set
  local env_var_name="$2"

  # Validate that both parameters are provided
  if [[ -z "$secret_name" || -z "$env_var_name" ]]; then
    echo "Usage: set_secret_as_env_var <secret_name> <environment_variable_name>"
    return 1
  fi

  # Fetch the Base64-encoded secret
  local base64_secret
  base64_secret=$(scw secret version access-by-path secret-name="$secret_name" revision=latest -o json | jq -r '.data')

  # Check if the command succeeded and returned a value
  if [[ -z "$base64_secret" ]]; then
    echo "Error: Failed to fetch the secret or secret is empty."
    return 1
  fi

  # Decode the Base64-encoded secret
  local decoded_secret
  decoded_secret=$(echo "$base64_secret" | base64 --decode)

  # Check if the decoding succeeded
  if [[ $? -ne 0 ]]; then
    echo "Error: Failed to decode the Base64 secret."
    return 1
  fi

  # Export the decoded secret as the specified environment variable
  export "$env_var_name"="$decoded_secret"

  # Optionally, print a success message
  echo "Environment variable $env_var_name set successfully"
}

export SUBDOMAIN="n8n"
export DOMAIN_NAME="european.cloud"
export GENERIC_TIMEZONE="Europe/Berlin"

set_secret_as_env_var "database-host" "DB_HOST"
set_secret_as_env_var "database-port" "DB_PORT"
set_secret_as_env_var "database-n8n-name" "DB_NAME"
set_secret_as_env_var "database-n8n-user-name" "DB_USER"
set_secret_as_env_var "database-n8n-user-password" "DB_PASSWORD"

docker compose -f /usr/local/scripts/n8n/docker-compose.yml up -d --remove-orphansI wanted to try the secret manager for the database credentials, because
- We do not need the database credentials on disk in the instance (however, we traded this for IAM credentials to be able to access the Secret Manager).
- The credentials are fetched on every (re-)start of the container. Through this, we have a very convenient mechanism should we need to update the database credentials.
- We have a central place for the credentials and secrets – the Secret Manager.
- The application goes through IAM for fetching the credentials.
This script we can put in an autostart script on our instance, e.g. in /var/lib/cloud/scripts/per-boot.
A quick recap on what we have so far
We now have the infrastructure in place and we have a start script that fetches the credentials for our PostgreSQL database from the Secret Manager and uses these to fire up the N8N using a small docker-compose.yml.
A few things are still missing for the whole thing to fly:
- The secrets must be in the Secret Manager.
- The instance must have an IAM access key to be able to access the credentials in the Secret Manager.
- An IAM application that we will issue the access key for. This application will only have the permission to read secrets from the secret manager.
- The instance must be configured to have the Scaleway CLI and jq, otherwise the starter script would fail.
Adding the Credentials to Secret Manager
For each configuration variable/secret, we need two Terraform resources: one for the secret and one for the secret version, holding the actual payload.
resource "scaleway_secret" "secret_database_host" {
  name        = "database-host"
  description = "The host address of our database"
  tags        = ["terraform", "n8n"]
}

resource "scaleway_secret_version" "secret_database_host_v1" {
  description = "V1 of the database host secret"
  secret_id   = scaleway_secret.secret_database_host.id
  data        = scaleway_rdb_instance.database.private_network.0.ip
}We add similar resources for all needed configuration variable/secret.
Creating an IAM application
To create the IAM application, we add to our Terraform
resource "scaleway_iam_application" "n8n_application" {
  name = "iam-n8n-application"
  organization_id = var.organization_id
  description = "N8N Application for ${var.project_name}"
  tags = ["terraform", "n8n"]
}

resource "scaleway_iam_policy" "iam_secret_policy" {
  name           = "iamp-n8n-secret-access"
  organization_id = var.organization_id
  application_id = scaleway_iam_application.n8n_application.id
  description    = "Policy for allowing the N8N application to access secrets"
  rule {
    project_ids          = [var.project_id]
    permission_set_names = ["SecretManagerReadOnly", "SecretManagerSecretAccess"]
  }
}

resource "scaleway_iam_api_key" "n8n_api_key" {
  application_id = scaleway_iam_application.n8n_application.id
  description    = "The credentials for the N8N application"
}Configuring the Instance
To initialize the Instance with the IAM API key and for installing the Scaleway CLI and jq, we are using Cloud Init. The modified Terraform for our instance now looks like this
resource "scaleway_instance_server" "n8n" {
  type = "DEV1-S"
  image = "docker"
  name = "n8n-server"

  user_data = {
    cloud-init = templatefile("${path.module}/cloud-init.yml", {
      ORGANIZATION_ID  = var.organization_id
      PROJECT_ID       = var.project_id
      SECRET_KEY       = scaleway_iam_api_key.n8n_api_key.secret_key
      ACCESS_KEY       = scaleway_iam_api_key.n8n_api_key.access_key
      REGION           = var.region
      ZONE             = var.zone
    })
  }
}…with the cloud-init.yml file. In Cloud Init, we are writing a SCW config file with the credentials of the IAM application. Furthermore, we are installing the SCW CLI itself and lastly jq.
#cloud-config
package_update: true
package_upgrade: true
write_files:
  - content: |
      access_key: ${ACCESS_KEY}
      secret_key: ${SECRET_KEY}
      default_project_id: ${PROJECT_ID}
      default_organization_id: ${ORGANIZATION_ID}
      default_region: ${REGION}
      default_zone: ${ZONE}
    path: /root/.config/scw/config.yaml
runcmd:
  # Install SCW CLI
  - [ sh, -c, "curl -s https://raw.githubusercontent.com/scaleway/scaleway-cli/master/scripts/get.sh | sh" ]
  # Install JQ
  - [ sh, -c, "apt install jq -y" ]
final_message: "SCW CLI initialized!"Looking ahead
Overall, the code to set up the N8N instance and all its surrounding services has gotten more than one might first expect. An instance and a database is almost the simplest infrastucture one can think of. I could have taken an easier route, especially if I had hardcoded the N8N configuration and not gone through the Secret Manager. Also, I am not 100% sure if this is an intended use case for it.
As the Secret Manager is a global service (within a project), it would be great if we could define an IAM policy which grants access to only certain secrets. Another great feature would be a Managed Identity that we could just attach to the instance, without having to juggle with access keys and secret keys.
Next up is to repeat the exercise, this time with Scaleway Kubernetes Kapsule.